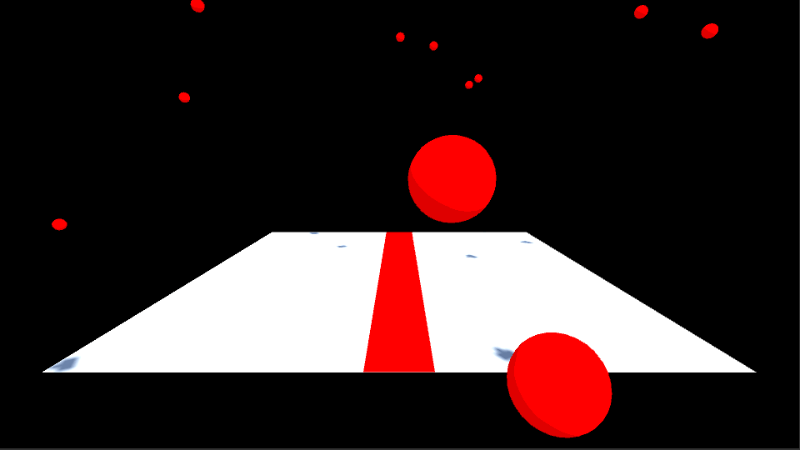
カジュアルなビジュアルスタイルのゲームと親和性の高い、木っ端微塵死亡エフェクトを実装。
ParticleSystemを使わず、小オブジェクトの生成で表現。
↓の自作ゲームで使用。
サンプル動画
真ん中の赤い床に接触すると破裂。
破片用のマテリアルを作成
- 上部メニュー -> Assets -> Create -> Materialを選択。
適当に「DeathEffectMaterial」と命名。- Shader:通常のままでも良いが、任意のシェーダーで。
- Albedo:任意の色に変更。
死亡エフェクトを作成
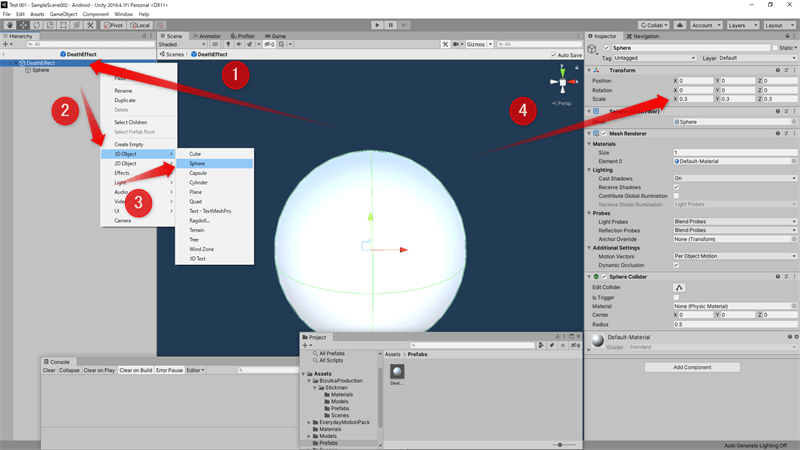
死亡エフェクト本体と破片オブジェクトを作成
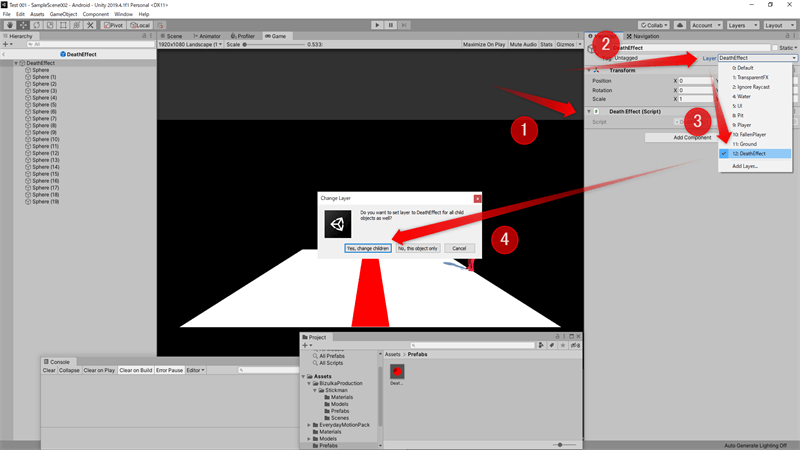
*画像の番号と、手順の番号は対応してないです。流れとして御覧ください。

次項の「レイヤーの設定」と跨いでいます。

- 上部メニュー -> GameObject -> Create Emptyを選択。
DeathEffectと命名。 - DeathEffectスクリプトを作成し、アタッチ。
- ヒエラルキー -> DeathEffectを右クリック -> 3D Object -> Sphereを選択。
続いて設定。- インスペクター -> Transformコンポーネント -> Scaleを(0.3, 0.3, 0.3)程に変更。
- インスペクター -> Mesh Rendererコンポーネント -> Materials -> Element 0へ、「DeathEffectMaterial」を設定。
- インスペクタ -> Add Component -> Rigidbodyをアタッチ。
- ヒエラルキー -> Sphereを右クリック -> Duplicateで、Sphereを20個程まで複製。
(ヒエラルキーで複数選択して実行すると早い)
DeathEffect側のコード
using System.Collections;
//使わなかったので一応コメントアウト。
//using System.Collections.Generic;
using UnityEngine;

public class DeathEffect : MonoBehaviour
{


//破片のRigidbodyを保持。
	Rigidbody[] childrenRigidbodies;

//爆発力。
	float deathEffectForce = 15.0f;
//爆発の半径。
	float deathEffectForceRadius = 10.0f;
//上向きに掛かる力の補正値。
	float deathEffectUpwardsModifier = 1.0f;


	Coroutine lifetimeTimer;

//非アクティブ化するまでの時間。
	float lifetime = 5.0f;

	void Awake()
	{
		childrenRigidbodies = GetComponentsInChildren<Rigidbody>();

		SetRandomPosition();
	}


//エフェクトを開始したい時に呼ぶ。
	public void StartEffect()
	{
		for (int i = 0; i < childrenRigidbodies.Length; i++)
		{
			childrenRigidbodies[i].AddExplosionForce(deathEffectForce, transform.position, deathEffectForceRadius, deathEffectUpwardsModifier, ForceMode.Impulse);
		}

		lifetimeTimer = StartCoroutine("LifetimeTimer");
	}

//毎回ランダムに散らばらせて配置している。
	void SetRandomPosition()
	{
		for (int i = 0; i < childrenRigidbodies.Length; i++)
		{
			childrenRigidbodies[i].transform.position = Random.insideUnitSphere;
		}
	}

//(オブジェクトプールにするのを想定)リセット。
	public void Reset()
	{
		ResetVelocity();
		SetRandomPosition();
	}

//(オブジェクトプールにするのを想定)加速度のリセット。破片には球体を使っているので、AngularVelocityはリセットしなくても多分大丈夫。
	void ResetVelocity()
	{
		for (int i = 0; i < childrenRigidbodies.Length; i++)
		{
			childrenRigidbodies[i].velocity = Vector3.zero;
		}
	}


//一定時間経過で、非アクティブ化するタイマー。
	IEnumerator LifetimeTimer()
	{
		yield return new WaitForSeconds(lifetime);
		gameObject.SetActive(false);
		Reset();
	}


//ゲームオーバー等、タイマー以外で非アクティブ化した場合の、タイマーの強制終了用。
//Resetの方から呼んでも良いが、一応分けた。
	public void ResetLifetimeTimer()
	{
		if (lifetimeTimer != null) {
			StopCoroutine(lifetimeTimer);
			lifetimeTimer = null;
		}
	}


}
(任意)一部レイヤーとの衝突判定を無効化
レイヤーの作成&変更
- インスペクター -> Layer(名前欄のやや下) -> Add Layer…を選択。
Tags&Layers画面を開き「DeathEffect」レイヤーを作成。 - 再びヒエラルキー -> DeathEffectを選択。
- インスペクター -> Layer -> DeathEffectを選択。
(Change Layerダイアログでは、Yes, change childrenを選択)
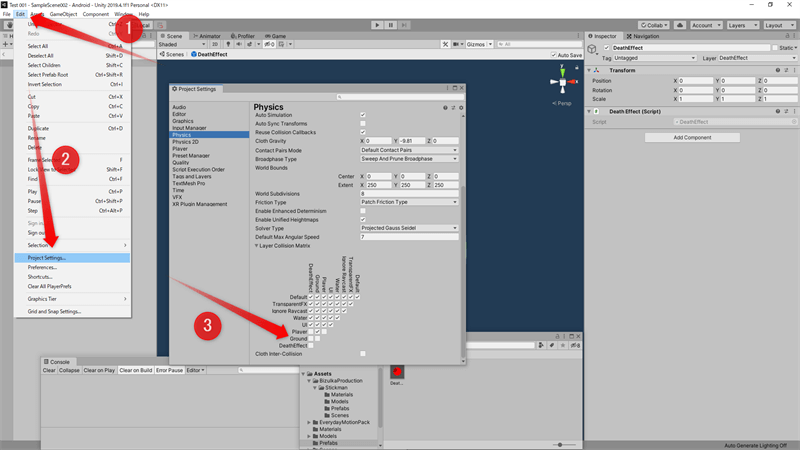
レイヤー間の衝突判定の無効化
*画像の番号と、手順の番号は対応してないです。

- 上部メニュー -> Edit -> Project Settings…を選択。
- Project Settingsウィンドウ -> サイドバーメニュー -> Physicsを選択。
- 下までスクロール -> Layer Collision Matrixで、DeathEffect x Player間等の衝突判定を無効化。
プレハブ化
- Projectウィンドウ -> 任意のフォルダに、DeathEffectをドラッグ&ドロップしてプレハブ化。
- ヒエラルキー -> DeathEffectを右クリック -> Deleteを選択、シーン上から削除。
プレイヤー側
- Player(対象とするオブジェクト)のメインスクリプトに追記。
もしくは、新規スクリプトを作成し、記述。 - ヒエラルキー -> Playerを選択。
- インスペクター -> Playerスクリプト -> deathEffectPrefabに、DeathEffectプレハブをフォルダからドラッグ&ドロップして紐付け。
- プレイヤーの死亡タイミングで、CreateDeathEffectを呼ぶ。
Player側のコード
//使わなかったので一応コメントアウト。
//using System.Collections;
//using System.Collections.Generic;
using UnityEngine;

public class Player : MonoBehaviour
{

//インスペクターでDeathEffectプレハブを紐付け。
	[SerializeField]
	GameObject deathEffectPrefab;

	DeathEffect deathEffect;


	void Awake()
	{
//割愛するが、実際に使用する際には、リストにしてオブジェクトプール化するべき。
		deathEffect = Instantiate(deathEffectPrefab).GetComponent<DeathEffect>();
		deathEffect.gameObject.SetActive(false);
	}


//呼び出しの例。各自で差し替えてください。
	void OnCollisionEnter(Collision col)
	{
		if (col.gameObject.CompareTag("DamageFloor")) {
			gameObject.SetActive(false);
			CreateDeathEffect();
		}
	}


//プレイヤーの位置に移動させてから、アクティブ化して、エフェクト開始。
	void CreateDeathEffect()
	{
		if (!deathEffect.gameObject.activeSelf) {
			deathEffect.transform.position = transform.position;
			deathEffect.gameObject.SetActive(true);

			deathEffect.StartEffect();
		}

	}

}


